Torch, cmake and Android Studio
I’ve created a working template project that will serve as the base for the following articles. With the binaries built we will proceed to add them to our Android Studio project so that Gradle and cmake can link our C code with them.
Template project setup
First you’ll have to clone the code:
git clone https://github.com/paramsen/torch-android-studio-template.git
Open Android Studio and import the project, before you can run the project on a device we need to add the binaries that got built in the last article:
./ refers to the root of the cloned project on disk
- Copy
armeabi-v7a,arm64-v8aandheadersinto./app/native-libs/ - Copy
luainto./app/src/main/assets/
Now you can proceed to run the project. In fact you’re all set for using my template project as a boilerplate for your own torch-android integration, it’s licensed under MIT. The code should be self-explanatory, but I suggest you continue to read the article if you want some more info about what’s going on.
Template project intro
I created this project because I found the “demos” in the torch-android repo so old that they were almost useless. The Android devs has deprecated the old NDK buildchain for cmake, swapped ANT/Maven to Gradle and most of us doesn’t manage our Android projects via the command line (with ANT…). I had to find out how to integrate torch-android into a modern Android project for my client, the lessons I learned are documented in this template project.
There are three fields of interest in the template project; The cmake build chain, dynamic Torch lifecycle and Torch invokation.
Gradle and cmake buildchain
Check out CMakeLists.txt to find out more about how I’ve setup cmake to link torch-android to my native C code. To see how the Gradle setup looks checkout build.gradle.
Dynamic Torch lifecycle
A requirement for my project was minimizing processing footprint. Therefore I needed to find a way to initialize and destroy the Torch instance as needed, since always keeping it in memory drains a lot of battery.
The singleton Torch instance lives between the JNIBridge.cpp#setup and JNIBridge.cpp#dispose calls. It doesn’t allocate memory or require processing power outside those two calls.
Dynamic Torch parameters
Another awesome feature found in JNIBridge.cpp#setup and Torch.cpp#setup is that the function allows for a path parameter. The param is used to dynamically instruct Torch from where to load the .net/.t7 file on disk. I couldn’t get the apkascii/apkbin64/etc functions to work, so my workaround is to write my .net file to disk and instruct Torch to load it from the path param. You can use the code to send other parameters to Torch, I couldn’t find a working example of this in the official demos so it’s a gem.
Here’s another example of sending a parameter to Torch in Torch.cpp#call
Torch net invokation
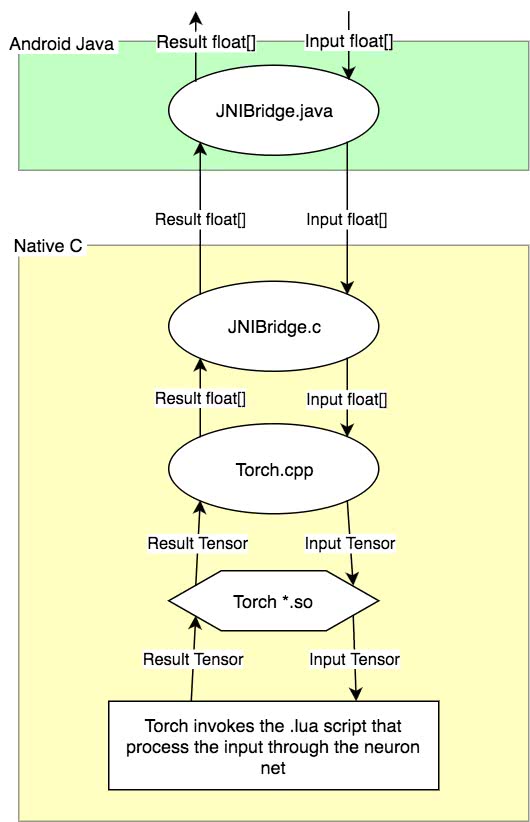
A float[] is created on the “Java side”, sent through the JNIBridge.java#call, bridged to the “C side” into the JNIBridge.cpp#call, converted to a FloatTensor, sent to Torch that invokes the loaded main.lua#call function with the FloatTensor parameter, then the result is returned through the call chain. The following image describes the flow better than words:
Extra: X86 support (emulator support)
I’ve setup the project to run on both x86 and ARM systems, even though Torch only supports ARM. This means you can use the emulator even though you have an ARM-only dependency. This is done through simply providing a stub implementation of the native parts when on x86. Here’s the magic CMakeLists.txt.
Conclusion
I planned to elaborate more on how to use torch-android and about my solutions; but my conclusion is that the code speaks better for itself. Let the template project serve as a up-to-date sample for how to use torch-android successfully. Should any questions arise there’s a comment section below and filing issues/pullreqs in Github is always welcome.